L02: Telescopes I reflectors and refractors


In the previous lectures we have seen how light arrives at our telescopes, but how do telescopes work to create an image? In the next block of lectures we're going to look at telescopes - how they work, and the pros and cons of different telescope designs. Telescopes are vital to astronomy, as they fulfil two roles:

  1. they allow the collection of light over a much larger area, so that faint objects can be studied,
  2. they provide higher angular resolution, allowing studies in greater spatial detail.
All telescope designs share certain basic principles of operations. We start with those principles.

Basic Principles

Figure 9 shows a schematic of a telescope. On the left, light from two distant sources arrives at the telescope. As all astronomical sources are effectively at an infinite distance compared to the dimensions of a telescope, the rays from each source can be assumed to be parallel.

The light is collected by an aperture of diameter \(D\) which forms an image of the two sources at the focal plane. The line through the centre of the aperture and the focal plane, and orthogonal to them, defines the optical axis of the system. Since the sources are at infinity, the focal length, \(F\), of the telescope is defined by the distance between the focal plane and the aperture. In astronomical telescopes, the aperture is usually a lens or a mirror, and is circular, hence the amount of light collected is proportional to \(D^2\).

The aperture diameter is the single most important parameter affecting the performance of a telescope and hence most telescopes are usually referred to in terms of it, e.g. the ESO 3.6m telescope in Chile, where the 3.6m is the diameter of its primary mirror.
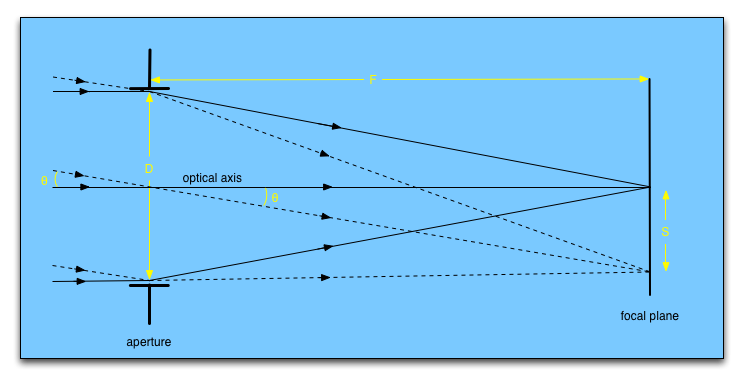
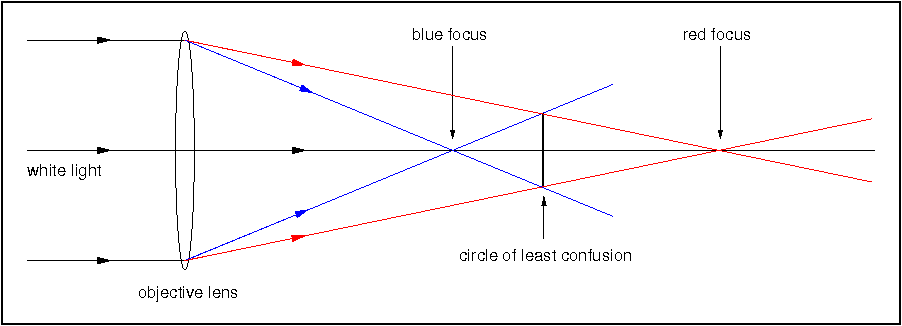
Figure 9: A schematic showing the function of a telescope. The 'aperture' in the figure represents an optical element, such as a mirror or lens, with the ability to bring light to a focus. Light rays from two objects, separated by an angle \(\theta\) on the sky, are shown. Notice how the image in the focal plane is upside down.

From figure 9, we can define two terms which are important for describing the specifications of a telescope.

Platescale

The plate scale, \(p\) relates the size of the image in the focal plane, \(s\), to it's angular size on the sky, \(\theta\). Given that \(\theta\) is usually small, we can apply the small angle approximation. Figure 34 shows that \(s\) and \(\theta\) are related by: \[ s=F \theta, \] where \(\theta\) is measured in radians. If we want to study an object with angular size \(\theta\) in high spatial detail, then \(s\) needs to be large. Therefore \(F\) needs to be large; we require a telescope with a long focal length.

The plate scale is the ratio between the angular size and the image size. In other words, \(p = \theta / s \). Since \(s=F \theta\), it follows that \(p = 1/F. \) Since we have used the small angle approximation, if \(F\) is measured in mm, this is the plate scale in radians per mm. It is more usual to quote the plate scale in arc seconds per mm. Since there is 206265 arc seconds in one radian, the plate scale in arc seconds per mm is given by \[p = 206265/F,\] where \(F\) is measured in mm.

Focal ratio

The focal ratio \(f\) is defined as the ratio of the focal length to the diameter, i.e \(f = F/D\). The focal ratio is often used to describe the speed of a telescope (it is used in photography the same way). this can be understood as follows. If we fix \(F\), the image scale \(s\) remains the same. For a smaller \(D\), less light is spread over the same area; the image gets dimmer. We would have to expose for longer to get the same amount of light in a given area. Therefore, large values of \(f\) imply slow telescopes, and vice-versa.


Refractors

The refracting telescope was the first type of telescope to be developed. The question of who invented the telescope is a controversial one. It is usually credited to the Dutch optician Hans Lippershey in 1608, although recent research suggests that a form of telescope may have been discovered by the Englishman Leonard Digges around 1550. The first person to systematically use a telescope for astronomy was the Italian scientist Galileo Galilei in 1610, however others were close behind, and the Englishman Thomas Harriot was the first to record a telescopic observation of the Moon, and Sunspots.

The refractor focuses light using a lens, known as the objective. The objective is usually made of glass and, in it's simplest form, has a bi-convex shape where both surfaces are sections of a sphere. The lens collects the parallel light from an astronomical source and forms an image of it, as shown in figure 10. This figure also shows that a simple refractor has a major defect, known as chromatic aberration. This aberration is the largest imperfection to affect astronomical telescopes.

Figure 10: Schematic of a simple refracting telescope, illustrating the effect of chromatic aberration. Credit: Vik Dhillon.
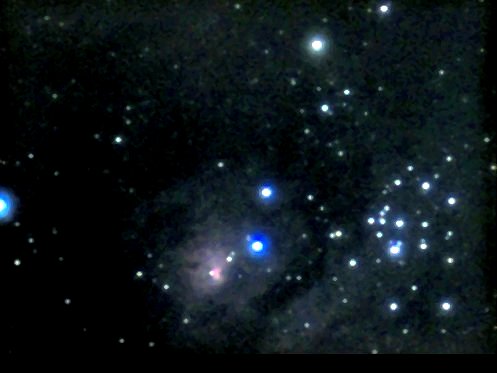
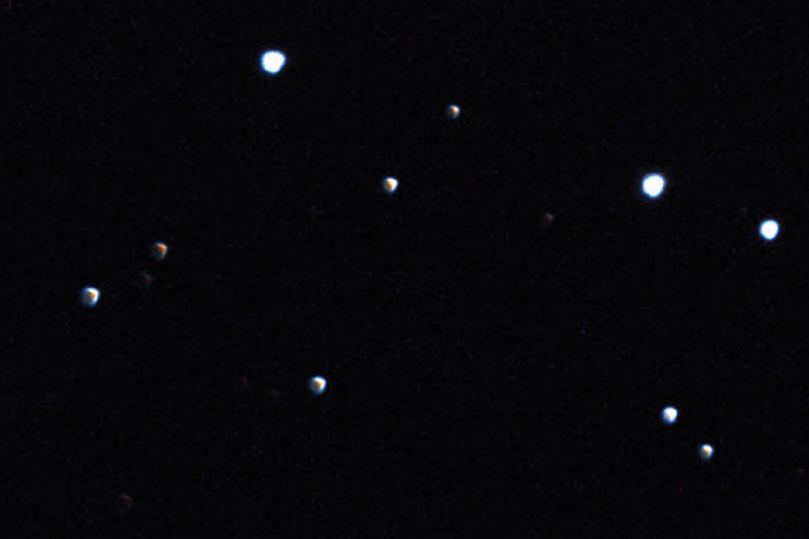
Figure 11: Photograph of the Lagoon Nebula, showing the blue halos due to chromatic aberration. The bright star at the top is probably quite red, and hence lacks a halo.

Chromatic aberration arises because the glasses used to make lenses typically have refractive indices which decrease as the wavelength of light increases, resulting in the focal length of the objective increasing as the wavelength increases. Hence there is no single focal plane in which light of all wavelengths from a star is in focus, as shown in figure 10. Moving the focal plane towards the lens will provide a point-like blue image surrounded by a red halo. Similarly, moving the focal plane away from the lens will result in a point-like red image surrounded by a blue halo, as shown in figure 11. A compromise can be reached by moving the focal plane to the circle of least confusion, as shown in figure 10. This is still a poor image, and clever design is needed to improve the refractor.

Achromats and Apochromats

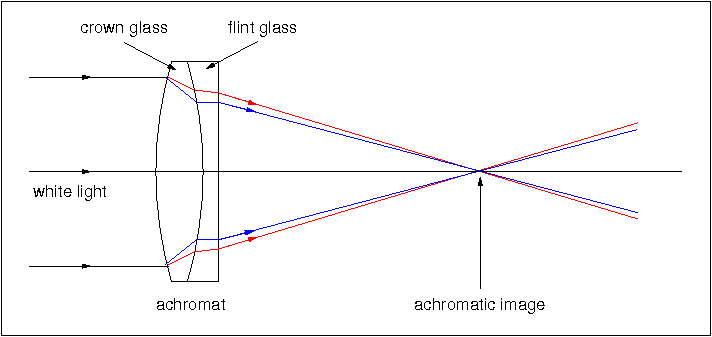
In 1758, the English optician John Dolland patented the achromatic doublet (or achromat). The achromat corrects for chromatic aberration by using two lenses made of different materials, typically crown and flint glass. The positive crown-glass lens strongly converges the light, but introduces strong chromatic aberration. The flint glass element is negative. It has a weak refractive index, so it does not undo the convergent effect of the crown glass element. However, the refractive index of flint glass changes rapidly with wavelength, and so it has a stronger effect on the blue light, thus correcting chromatic aberration. The situation is shown schematically in figure 12.

Figure 12: Schematic showing how an achromatic doublet can correct for chromatic aberration by bringing light of two different colours to the same focus. Credit: Vik Dhillon

An achromatic doublet can only make the focus the same for two wavelengths and there is residual chromatic aberration at intermediate wavelengths. Nevertheless, achromats deliver order-of-magnitude reductions in chromatic aberration. Further improvement is possible by adding a third lens. These are called apochromats, and they can bring three wavelengths (e.g. red, green and blue) to the same focus. Even greater improvements can be obtained by adding more lenses, so-called super-apochromats, but these become economically unviable for the large apertures required for telescope objectives.

Refractors: Pros & Cons

Since apochromats use flint glass to undo some of the convergent effects of the crown glass element, one implication of using achromats to minimise aberrations is that the focal length becomes quite long. This makes refractors slow, with focal ratios around 10 to 20. The plate scale is therefore quite small, which spreads the image of a point source over a large area in the focal plane. This makes refractors a poor choice for faint objects, but ideal for planetary observations and astrometry (i.e. measuring the positions of stars).

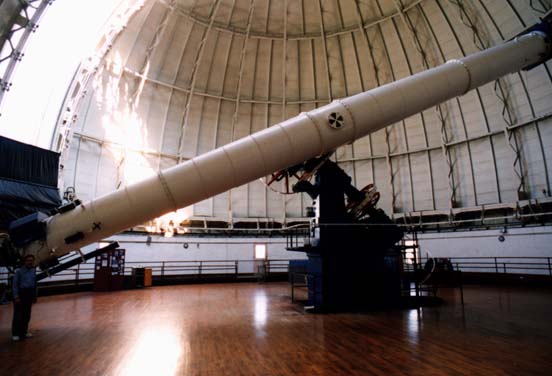
One of the biggest issues with refractors is their practicality as we move to larger telescopes. The lens in a refractor has to be held by its edge, and as the lens becomes larger it starts sagging under its own weight and hence distorts the image; second, as the diameter of the lens increases, so does its thickness and thus so does the amount of light absorbed in the glass. As a result, the largest refractor currently in existence is the 40-inch (1m) telescope at Yerkes Observatory near Chicago, built in 1897. Figure 13 shows the immense scale of the telescope tube and dome - it is unlikely that a bigger refractor will ever be built.

Because of the immense challenge in building large refractors, most professional telescopes are reflecting telescopes.

Figure 13: A photogaph of the 40-inch, f/19 Yerkes refractor. Note human on left for scale.

Using Mirrors

Chromatic aberration is the most serious aberration that affects any optical telescope. It is, however, easily avoided. Reflecting telescopes use mirrors to collect and focus light. Since these rely on reflection, and not refraction, they are free from chromatic aberration. Mirrors are also simpler than lenses in that they only have a single optical surface. Mirrors are usually made of a rigid, hard (i.e. polishable) material with a low thermal expansion coefficient (such as the glass Pyrex), and coated with a thin layer of aluminium, silver or gold to give high reflectivity. A telescope which uses a mirror to collect and focus light is known as a reflector.

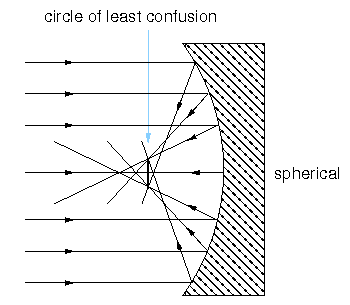
Reflectors, are not aberration free, however. The easiest mirror to make is a spherical mirror. Figure 14 shows that the rays from the edge of a spherical mirror come to a focus nearer the mirror than do rays from the centre of the mirror, causing a point source to be imaged as a blurred disc. This defect is known as spherical aberration.

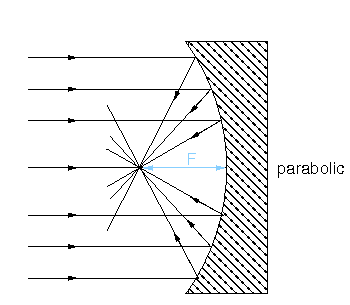
Figure 14: Left: Top: a schematic showing how a spherical concave mirror can collect light and bring it to a focus. The resulting image suffers from spherical aberration. Right: Bottom: spherical aberration can be removed using a parabolic mirror, as shown in the right panel. Credit: Vik Dhillon
Spherical Aberration and Parabolic Mirrors

The effects of spherical aberration in mirrors can be reduced by positioning the focal plane coincident with the circle of least confusion, as shown in figure 14, but this still leaves an unsatisfactory blurring of the image. However, the Scottish astronomer James Gregory realised in 1663 that spherical aberration can be eliminated if the curve of the surface of a mirror is a parabola. This is also shown in figure 14, where all on-axis rays parallel to the axis of a parabolic mirror are reflected to meet at the focus of the parabola.

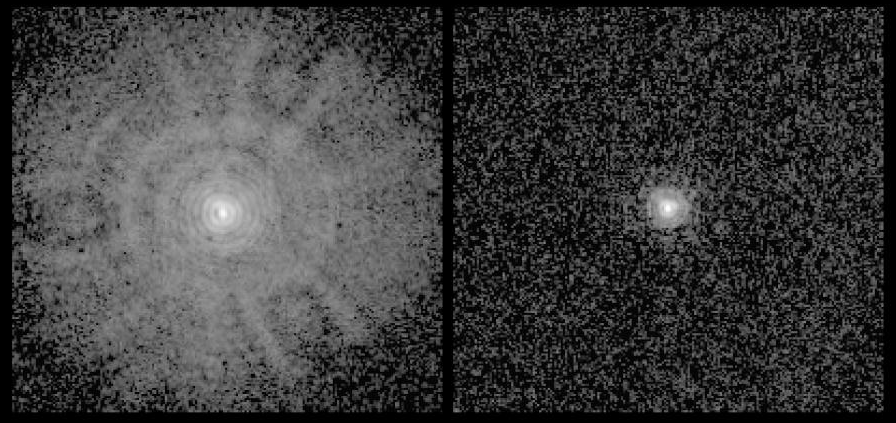
Creating mirrors with parabolic surfaces is not straightforward, as special grinding and polishing techniques are required in order to create the deeper central depression of a parabola compared to a spherical surface. A famous example of spherical aberration is given by the Hubble Space Telescope (HST), which suffered from spherical aberration due to a mistake during the manufacture of its (hyperbolic) 2.4m mirror, as shown in figure 15. Corrective optics were later installed by astronauts on a space shuttle servicing mission and the telescope is now functioning perfectly.

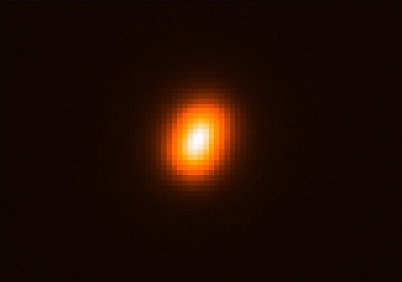
Figure 15: Left: Image of a star taken with the HST, showing the blurred, circularly-symmetric image characteristic of spherical aberration. Right: Image of a star taken with the corrected HST, showing just the Airy disc and diffraction rings, indicating that the spherical aberration has been successfully removed: the image of the star on the left covers approximately 2 arcseconds, whereas that on the right covers only 0.05 arcseconds.

It should be noted that lenses, and hence refractors, suffer from spherical aberration in exactly the same way as mirrors, but it is a much smaller effect than chromatic aberration. Spherical aberration can be eliminated from refractors using aspheric lenses, in which the curvature of the surfaces is not constant, but these are difficult and expensive to produce. It is more common to remove spherical aberration from refractors by designing achromats in such a way that the negative lens cancels out the spherical aberration introduced by the positive lens, whilst still correcting for chromatic aberration.


Off-Axis Aberrations

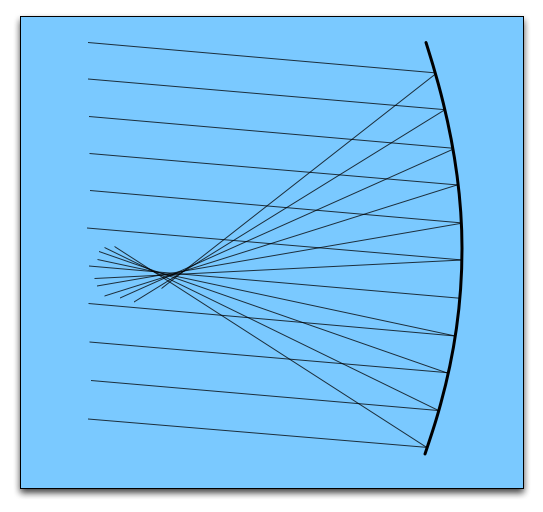
Parabolic mirrors only bring on-axis light to a single point of focus. In figure 16, we see what happens when off-axis sources are imaged using a parabolic mirror. We can see that the light is not brought to a well-defined focus, thus producing off-axis aberrations. Note that these aberrations are not unique to parabolic mirrors: refractors and spherical mirrors suffer from them too. Due to their nature, off-axis aberrations affect objects imaged at the edges of the field of view.

Figure 16: Schematic showing off-axis rays of light being brought to focus by a parabolic mirror. For off-axis rays, there is no good focal point, leading to aberrations.
coma, astigmatism, curvature of field and distortion of field

We will only briefly discuss off-axis aberrations here. If you want to know more about how they arise, see Vik Dhillon's detailed notes. For more info on each off-axis aberration, click on the buttons below.

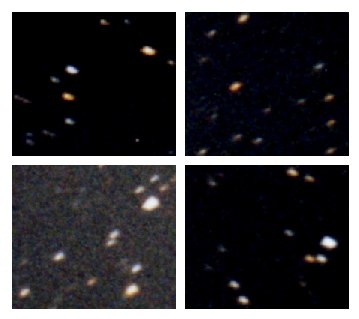
Figure 17: Coma is the largest off-axis aberration. It derives its name from the comet-like appearance of the resulting images, as shown in the figure below. At the centre of the focal plane, the images of the stars are point-like. Moving towards the edge of the image, however, the stellar images become increasing comet-like, with the faint, fanned 'tail' always pointing away from the centre of the field.
Figure 18: The next most important off-axis aberration is astigmatism. Astigmatism can easily be recognised in a telescope if the images of off-axis point sources are elliptical. The presence of astigmatism can be confirmed by adjusting the telescope focus, i.e. moving the focal plane, first one way and then the other. The ellipse should turn into a circle and then into an ellipse again on the other side of the best focus, but with its major axis rotated by 90o. It is important not to confuse this aberration, which affects only off-axis images, with the eye defect of the same name, which affects the entire field of vision and is due to a misshapen eye lens.
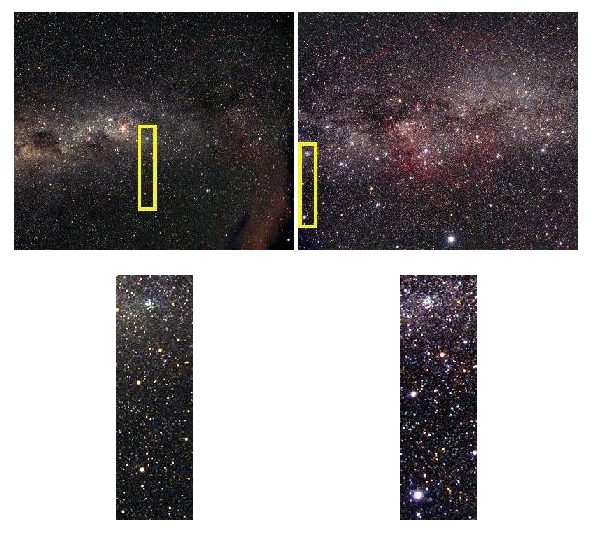
Figure 19: Distortion of field is said to be present when the plate scale varies over the focal plane, as shown in the figure. The yellow box in the left-hand image is near the field centre. The positions of the two brightest stars in this yellow box should be compared with the positions of the same two stars in the right-hand image, which are now at the field edge. It can be seen that, although the individual stellar images appear aberration-free, their separation is much greater in the right-hand image, i.e. the plate scale is smaller.
Figure 20: Curvature of field is said to be present when the points of best focus lie on a curved rather than a flat focal plane. An example of the resulting image is shown in the figure, which shows the corners of a much wider field photograph. The image shows how the blurring occurs in a radial direction with respect to the centre of the field. Curvature of field can be reduced using field flattening lenses