Visual use of research telescopes is rare, because the eye is such a poor detector. However, it is a common way of using amateur telescopes. For visual use, an eyepiece is required. A schematic showing the use of an eyepiece is shown in figure 50.
L08: Using Telescopes amateur astronomy
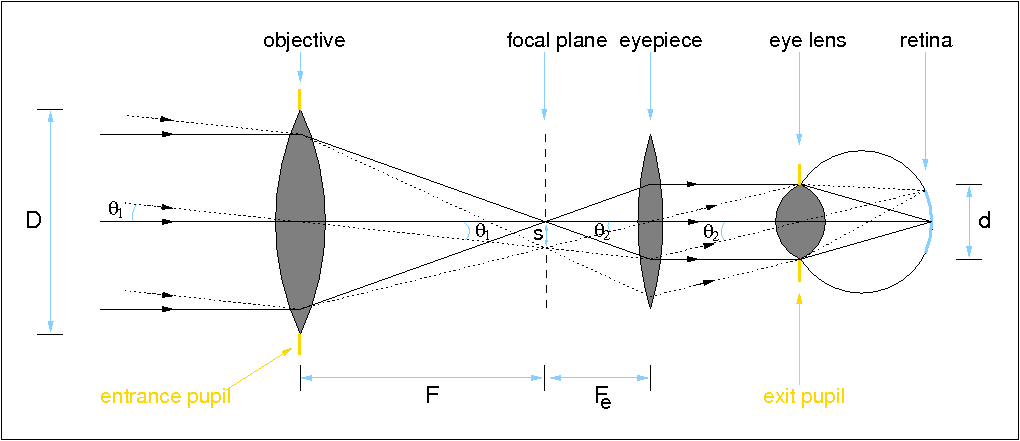
The role of the eyepiece can be thought of as a magnifying glass which takes the diverging rays of light from each point in the focal plane and makes them parallel. The lens in the eye then focuses this parallel light, creating an image of the object on the retina, as seen in figure 50. The image on the retina is the correct way up. However, since the brain inverts all images falling on the retina (if it didn't, the everyday world around us would look upside down!), the view in a telescope appears upside down.
Eyepiece properties
Looking in more detail at figure 50, it is useful to define the following terms: the entrance pupil is the area at the entrance of the telescope that can accept light. The exit pupil is the image of the entrance pupil formed by the eyepiece. During visual use, only rays which pass through the exit pupil can enter the eye. Therefore, the exit pupil should not be greater than the size of the dark-adapted pupil of the eye, i.e. about 8mm. Light is also lost if the eye is placed closer or further away form the eyepiece than the exit pupil. The distance of the last lens of the eyepiece to the exit pupil is known as the eye relief.
Many different designs for telescope eyepieces are available. More expensive eyepieces use multiple lenses to reduce aberrations and provide comfortable eye relief. But the most important property of an eyepiece is it's focal length, which defines the magnification.
Magnification
By definition, a lens of focal length \(F\) takes parallel light and produces a point image in it's focal plane - a distance \(F\) from the lens. Two point sources separated by an angle \(\theta_1\) will be separated by a distance \(s\) in the focal plane. From figure 50, we can see that, for a focussed telescope, the focal plane of the objective lens and the eyepiece is the same. Therefore \[s = F\theta_1 = F_e \theta_2,\] where \(F_e\) is the focal length of the eyepiece, and \(\theta_2\) is the angle at which the parallel beam produced by the eyepiece diverge. We can re-write this as \[\theta_2 = \frac{F}{F_e} \theta_1.\] Viewed with the naked eye, these two sources would be separated by an angle \(\theta_1\), but the telescope and eyepiece means we see them separated by an angle \(\theta_2\). If \( \theta_2 > \theta_1 \), the image is magnified. We therefore define the magnification, as \[M = \frac{\theta_2}{\theta_1} = \frac{F}{F_e}.\] The most obvious implication is that eyepieces with a small focal length produce the most magnification - a result which will seem counter-intuitive to those of you keen on photography.
Useful magnification
Only a limited range of eyepieces will be useful for any given telescope. For a full discussion of magnification limits, see Vik Dhillon's notes. We will only discuss these limits briefly here.
A further inspection of the on-axis rays in figure 50 shows that the triangle formed by the diameter of the objective, \(D\), and the image in the focal plane at a distance \(F\) from the objective is similar to the triangle formed by the diameter of the exit pupil at the eyepiece, \(d\), and the image in the focal plane at a distance \(F_e\) from the eyepiece, i.e. \[D / d = F / Fe = M.\] Hence an alternative way to express magnification is as the ratio of the diameters of the objective and the exit pupil. This naturally leads to a lower limit to the useful magnification of a telescope; the magnification must be sufficiently high to make the exit pupil equal to or smaller than the diameter of the dark-adapted pupil of the eye, otherwise not all of the light collected by the telescope will be gathered by the eye. If we write the eye's pupil diameter as \(d_{\rm eye}\), then \(d = D/M \le d_{\rm eye}\), so \[ M \ge D/d_{\rm eye} \ge D/8,\] if the telescope diameter \(D\) is measured in mm.
To produce high magnifications, remember that we need eyepieces with a short focal length. An upper limit on magnification results from the fact that the exit pupil shrinks as the focal length of the eyepiece decreases. The eye's vision starts to become impaired for beams of less than about 1mm, so exit pupils smaller than about 1mm are not useful. This sets an upper limit of \[M \le D.\] Hence an 200mm diameter telescope, would have a maximum magnifications of around 200.
Telescope Mounts
A telescope mount must hold the telescope stably, and be able to track an object as it moves in the night sky. The only type of mount available before the 1980s, and still a common mount for smaller telescopes is the equatorial mount, shown in figure 51 below.
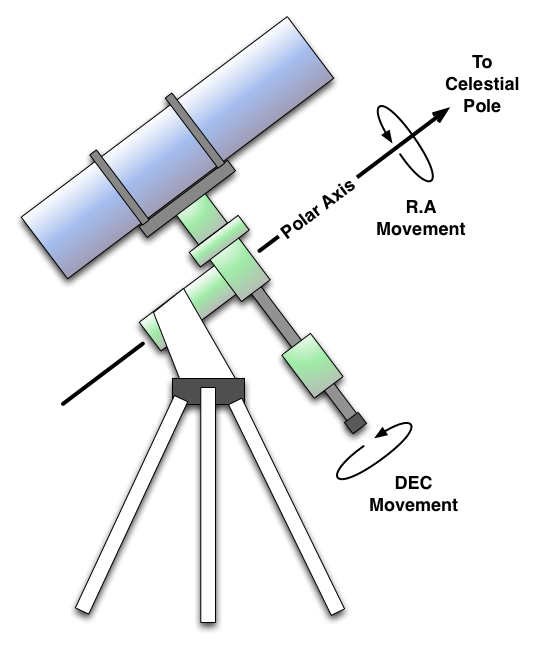
The beauty of an equatorial mount is the one-to-one relationship between RA and Dec and the axes of the mount. Not only does this make it easy to point at an object, this also makes it simple to track the motion of an object due to the Earth's rotation by driving just the polar axis at an equal angular velocity, but in the opposite direction, to the angular velocity of the Earth on its rotation axis.
There are many different types of equatorial mount, described in detail for the curious in Vik Dhillon's notes. However, all share the same flaw - the polar axis must be aligned with the Earth's rotation axis. This means that unless the telescope is situated at the Earth's poles, the polar axis will be inclined relative to the ground, thereby creating stresses on the axes which vary as the telescope moves. For large research telescopes, such as the 3.9m Anglo-Australian Telescope, this makes equatorial mounts incredibly hard to build, since the amount of material needed to make them rigid becomes prohibitive.
The solution to this is use an Alt-Az Mount, short for Altitude-Azimuth. As the name implies, the two axes of this mount are aligned with the altitude and azimuth axes of the horizontal coordinate system. The telescope is mounted on a short fork, as shown in figure 52. The great advantage of the Alt-Az mount is the telescope's center of mass is fixed above the mounting point, meaning that very stable mounts can be built, even for the largest telescopes.
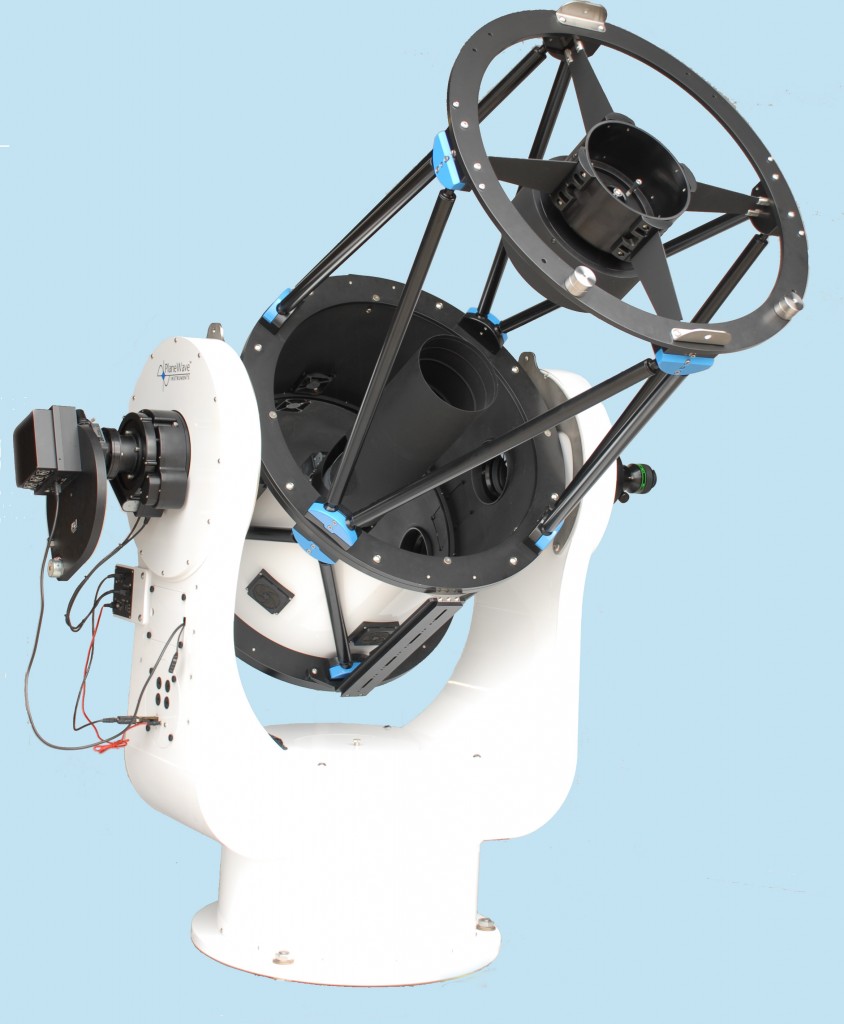
Alt-Az mounts are the only choice for the largest telescopes in the world, but they are not without disadvantages. For a start, tracking an object requires moving both axes of the mount, unlike an equatorial mount. Moreover, the speed at which each axis must move depends on the location of the object. The calculations required to move the two axes are quite complex (a coordinate conversion between the equatorial and horizontal systems) and need to be performed many times a second. This requires the use of a computer, but computers only became readily available in the 1970's. It is for this reason that every major research telescope made since the 1980's uses an alt-azimuth mount, but every telescope made before this time was mounted equatorially.
Another big disadvantage of Alt-Az mounts is that the orientation of the telescope remains fixed with respect to the horizon. Since the night sky rotates around an axis which is inclined to the horizon, this means the orientation of the night sky, with respect to the telescope, changes over time. This effect, known as field rotation, is shown in figure 53 below. Field rotation of Alt-Az mounts means that they are unsuitable for amateur astro-photograpy. Professional observatories get round this problem by having a field rotator, which mimics the rotation of the sky, keeping the camera orientation fixed with respect to the stars.
Which Telescope Should I Buy?
Based on what we've learned, what telescope should you buy? The answer is, of course, that it depends on what you want to use it for! Will you be looking at very faint objects like Galaxies, or bright ones, like planets? Faint objects require a large aperture to collect a lot of light, and thus have a small focal ratio, \(f = F/D\). 6 to 8 inch telescopes or larger are good for looking at faint sources, and the more aperture you have, the fainter you can go. Resolving the fine detail of planets requires a long focal length, which will imply slow focal ratios! These telescopes may be great for planets, but not so good for faint galaxies.
Reflector or refractor? This will depend on budget to some extent. Refractors are very easy to use and produce great views and images with little maintenance. For this reason they are popular for astrophotography. However, refractors are bulkier and heavier than a reflector with the same aperture, and large aperture refractors are very expensive! Reflectors are the cheapest way to get a large aperture, but they need looking after to produce sharp images.
What design of reflector? Newtonians are an excellent beginners scope, offering lots of aperture for little cost. They are fast for reflectors (f/5) and so good for faint objects. However, they are physically quite large, and the eyepiece location can be awkward! Schmidt-Cassegrains offer smaller sizes and a more convenient eyepiece location. They are slower (f/10) and so are better for detailed views of brighter objects, but worse for faint galaxies. If money is no option, buy a Ritchey-Chretien!
What kind of mount? If you are using the telescope purely for visual use, then an Alt-Az mount is easy to use, and easy to set up. An equatorial mount is essential if you want to take photos, but it can take some time aligning the polar axis. If you want to track the stars you'll need a motorised mount - this will vastly up the price so if you only plan on visual use, think if you really need it. It's worth spending a fair fraction of your budget on the mount - a stable mount with smooth tracking will make both visual use and photography much more pleasant. If you buy a high quality mount, the telescope often comes free!
Whatever you do, don't buy a telescope based upon magnification. As we have seen, magnification is easily changed with different eyepieces, and a telescope which advertises itself on magnification is very rarely a quality piece of kit.